Showing posts with label Pinterest. Show all posts

Tuesday, April 30, 2013

So Busy, Better Back Track

These past few weeks have been super busy.  I went out of town for about a week to see family and have a girls weekend.  Isaac has been getting pickier about what he eats and has been testing his limits even more.   He still won't use a spoon to feed himself and has decided he doesn't like chunks of chicken...the little turkey.  Hopefully we'll be able to change that attitude soon, before all the travel starts.

I was looking through projects I have done, some pre-blog, and realized I should back up and go over some of those.  I don't have tons of pictures for them since it was pre-blog and I wasn't thinking about the possibility of needing any pictures.  Today we'll look at the "butterfly feet" project.  We did this one last year for our mom's on Mother's Day.  I thought sharing it might help inspire me to figure out what we should do this year.

Footprint butterflies tracy_mcanally  Footprint butterflies  Footprint butterflies
This was the inspiration behind the idea. I found it on Pinterest and thought it would be a good idea to do while Isaac was still little.
Now, for this project I went and bought 2 canvas squares and Crayola Finger paint.  I thought that would be the easiest to clean off our 4 month old. I had Eli start, we did one foot at a time and did both pieces at the same time.  I let him choose his colors, then we chose Isaac's, and I chose mine accordingly.  Since we had the top and bottom different colors, I painted it on his foot.  A few tips, paint everywhere, even if you have high arches.  Try not to paint the entire toe is you want there to be differentiation between the foot and the toes (so that it actually looks like a foot).
Eli doing his feet. The paint doesn't really drip, but be sure to put down a drop cloth in case you accidentally step or lose your balance.  Then you won't be mad at yourself for getting paint on the carpet.

Isaac got to hang out in the laundry basket.  I put a blanket in so he was more comfortable and propped him up in the corner.  We did the project just before bath time and put him in a sleeper sack.  It was the easiest way to disrobe him when it was his turn, and we only had to rinse his feet before his bath.

I did my feet before we did Isaac's to make sure that mine would fit.  His were little and could go anywhere.  We got a little too much paint on his toes, oops.  It does take two because he wanted to pull his feet up so it took one of us to hold him, and the other to help him make a foot print.

 
You can see it after we all had our turn.  We decided there wasn't enough room between our feet, so we put Isaac's in the middle above.  Below is a closer picture.  In case you didn't notice, Isaac's colors are those created by mixing Eli's and mine.  I choose green on top to make Isaac's a darker green when mixed with blue because Eli and I didn't want to have the same color and we didn't want one of Isaac's to be purple.


I took a sharpie and drew in the bodies.  The size and shape were determined by the amount of space between our feet and the way out feet were shaped.  After I wrote "Happy Mother's Day 2012" and signed it. Sorry, didn't get a picture of that.  This project was easy enough, but I just don't have any ideas for this year.  Isaac is old enough to resist to make these projects more difficult, but not quite old enough to understand directions to participate.  I might think of doing a paint project with him if it was warm enough outside, but we got snow this morning so that probably won't work.
 
I'd gladly listen to suggestions and feel free to use this idea! Next week (with luck) will be another back up project before I get too busy.  Once travel hits, posts will be scarce but I should have some great pictures to share after at least a few weddings!

Wednesday, January 23, 2013

Glitter Sugar

Many have probably seen the posts and pictures all over about glitter sugar, do it yourself.  Well, for the Northern Foundation Ball I decided that I would make some glitter sugar to subsitute for glitter as a cheap alternative.  I wanted one of the options for centerpieces to be a vase filled with sugar and mask stuck in the sugar.
Well I found a link on pinterest. It told me how much sugar and food coloring to use. I mixed it in a ziplock bag and you can see it is a little wet.
Yes, that photo behind the bag is the one that came with the pinterest instructions I found.
 
I just spread the sugar out a bit to bake it.

The instructions said to bake it for 10 minutes at 350 degrees.  The sugar melted...
 
I had seen some comments that said the sugar melted or clumped together a bit, but to just break it up and it would look like glitter.  It didn't really break up much and it was burnt.  It smelled, looked, and tasted burnt. So I was set on trying to figure things out.
I used the same measurements and mixing method.  1/4 cup sugar and enough drops to color the sugar the color I wanted it.  About 5 drops.
 
I decided to lower the temperature to 200 degrees. Please note, I let my oven cool then preheated it up again to be sure the temperature wasn't over 200. The photo above is what it looked like when I took it out of the oven.
 
It only took 2 minutes.  I broke up the clumps and wallah! It turned out pretty good. 
Well, they went with a few of my other ideas instead, but this will be good to know for the future.  Whether I'm looking to cut costs or decorating a cake.


Sunday, January 6, 2013

Giant Peanut Butter Cup

So you may have noticed that I'm playing a little catch up.   I tried to post during the holidays and it was just a little busy.  I didn't post while we were gone on our trip, then we hit the ground running when we got back.  Big meeting coming up, which means I've been working, working, working.  I didn't take the little man to daycare since he's been busying himself pretty well, but I ended up working a good part of the evenings when Eli got home, over the weekend, and will have just a little more work to do Monday to finish preparing for Tuesday.
The biggest slow down has been the cold and the wind.  Upstairs is cozy and even a little warm, but down stairs is freezing!  It is too cold for me to work down there, which means trying to work down there with Isaac is a big no.  Having to work at the kitchen table isn't ideal and makes Isaac want to help me.  I also need to do some spray painting but it has been too windy to do that.  I did the small pieces the other day and it wasn't bad but ended up having to put the paint on too heavy in order to avoid having to go out and do another coat.  Hopefully it will stop tomorrow or I'll just have to hope I don't get myself too bad with the spray paint.
Anyways...on to the giant pb cup.  I got inspired for Eli's stocking stuffer and set my sights high.  He loves Reese's Peanut Butter Cups so I wanted to make him a giant one.  I began looking for recipes for pb cups and happened upon one for a giant one! What luck!...or so I thought.  The recipe left some to be desired.  It listed ingredients, then used different amounts in the recipe.  It came from a blog (not a bad thing) but the author incorporated her thoughts into the recipe too much, making it hard to follow.  I'm all for hearing the thoughts but don't like it when they get too jumbled in the recipe.  
This is the inspiration picture. I knew mine wouldn't look like that since I wanted to make it in a dish to be kept in the freezer while we were gone.

Here is the link to the orginal recipe: http://www.cutoutandkeep.net/projects/giant_reeses_peanut_butter_cup

 
Now she says she used Reese's Peanut Butter.  I couldn't find it anywhere...or at least not at the 2 places in town that I had to look. Not sure if they still make it or not.  I'm not going to post the recipe here because there are some changes I would make but haven't been able to test them.  She also says in the ingredients to get an 18 oz container of pb but in the recipe uses 4 tablespoons!! I was so mad when I saw that but then...I used 18+ ounces and I don't think it was enough (I used all the creamy we had and it wouldn't be right with crunchy)!  I ended up making way too much peanut butter filling because I used about 3 1/2 cups of powdered sugar like it called for.  I thought it was too much powdered sugar.  Use less and maybe you won't need the 18+ ounces of peanut butter I needed.  I also made my bottom chocolate too thick.  I used two 11 oz bags of milk chocolate chips, I thought "oh, one on bottom and one on top!"  No. Next time I'd used 1/2-3/4 of the bag on the bottom and the rest on the top.  I think my pan was also smaller than one that she used.  I found a quiche dish so the edges would be more like a Reese's but I wanted to be able to leave it in the pan and in the freezer while were were gone.  I thought about lining the dish but ended up not doing it.  It has worked great and didn't stick like I was worried about.
So you can see I had too much peanut butter filling.  I just used a butter knife to cut and remove some.
I cut some out around the edges and off the top.  I then put it aside, back in the bowl.
You can tell I didn't have quite enough chocolate to make the top smooth, but it covered so success! 

 
I put it in the freezer to speed up the setting up process so that I could then hide it until Christmas.  There are a few air bubbles, but I just tapped the dish on the counter and they came out.  Now, with the excess peanut butter mixture I made mini ones.  I didn't have anymore milk chocolate so I used semi-sweet chips.  In her recipe she warns against using these and adding milk because it turned out runny and not set-up.  Well, I didn't have much of a choice.  I tried to melt some chips and shortening but they didn't melt down smooth enough so I added some milk chocolate.  I balled the peanut butter up and (because I didn't have the time) I didn't do a bottom layer of chocolate.
 
I used a muffin tin and some left over cupcake liners.  I made them a little big because I didn't want to make very many, so I filled just the one tin.

 
I poured the chocolate over the top so they were something between a peanut butter cup and a bon-bon.
 
These didn't set-up well.  I put them in the freezer to speed the process.  They were okay to sit out a little bit but after a few hours, they would get too warm and were a mess to eat.  They weren't too hard straight out of the freezer so that is how I  served them.  Too much powdered sugar, but next time I'll try less and the same amount of peanut butter to see what I get.
 
Well, now I hope we're caught up a bit cause I'll be busy busy during my normal posting time this next week.  But stay tuned, I have a new Pinterst fail coming up!


Tuesday, September 25, 2012

Pinterest Fail!

 
Since I won't be able to post at my normal time this week, I didn't post last week and decided to split the difference.  I've been working on putting together a wedding organizer that can be personalized for each bride and groom.  It of course is taking longer than planned, but I've been using postings I found on Pinterest to cross reference and add to what I have. 
 
Working on the binder and searching Pinterest for ideas on what I may have forgotten, made me think of all those Pinterest projects that I've tried and failed at.  I haven't taken photos of all of them, and there have been many, but here are a few.
 
Booties for my son:

Now, this may not look like a fail, but it is.  I followed the directions (to a T, I thought) and we had even recently measured his foot so I choose the pattern that should have been big enough.  What you can't see in the photo is the stitching showing on the back heel and the fact that they did NOT fit my son.  I couldn't even get it on his foot.  Guess I'll have to try again or find a different pattern.  I couldn't get his foot in because the space between the front of the shoe (tongue area) to the heel wasn't wide enough.
 
The apron:

 When cooking, I constantly grab the towel and end up with food all over my pants.  How to solve this problem? Make an apron! I found this cute scalloped edge apron and thought it would be perfect.  I couldn't find material that I liked in which there was enough (the 2 sides are different, the tie is supposed to be what the opposite side is) so I got 3 kinds.  I figured the pockets (was unsure if I wanted them) and the tie could be different, not a big deal.  I printed off the instructions and the pattern.  The pattern was 15 pages and each page was a different file to download and print.  I could deal with that.  Then, as I was trying to put the pattern together, there were only about 5 pages in which I could see the writing....and my printer wasn't out of ink.  I could see a random middle side, one top corner, one bottom corner, and part of the tie back.  Well that wasn't going to work, so I free handed the pattern.  My scallops weren't perfect but the top was to be gathered so I thought they'd be fine.  As I was attempting to gather the top, my thread kept breaking.  Hey it is usable, just not as pretty.

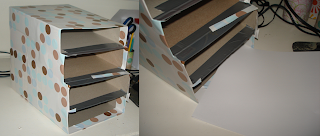
The paper shelves:

This one is partly my inadequate thought process.  I saw that someone had used the flat-rate boxes to help organize their papers and thought it was a great idea, especially since I was in need of one since I had just started the business.  I didn't really want to walk into the post office and take flat rate boxes to used for it and decided to use cereal boxes.  While I was saving them, I saw that for a few other paper holding projects others had used cereal boxes so I thought I was brilliant!  I wanted to just use contact paper I had leftover so I knew it wouldn't be too pretty.  I just wanted to put it together and when I find contact paper I liked, I'd recover it.  As I was putting it together, I discovered that the cereal boxes were different sizes, even if it was the same type of cereal.  I decided that I would just put the taller ones on bottom, not a big deal.  When I was done, I found out that the paper didn't fit into the cereal box! Oh dear.  That wasn't going to fly.  This project was tossed and called a fail.

The homemade ice cream:  I didn't take a picture of this one, but it wasn't ice cream.  The directions said to use Ziploc bags, but we had just run out of the correct sizes.  I figured I could use Tupperware.  Wrong.  After 20 minutes of shaking and it spilling a little, it was still liquid.  The directions said it would take 5 minutes, which I knew that with the Tupperware it would take longer so that wasn't a surprise.  I finally was over my craving and tired of shaking the Tupperware so I just put it in the freezer.  I took it out and put it in the fridge the next day so it would melt slightly and I could shake it some more.  It had turned icy and didn't really shake anymore.  It hadn't completely melted so I decided I'd just add some peanut butter and it'd be pb ice cream.  It was more like pb and ice crystals.  Another fail!

These are just a few of my fails, but I guess I'll learn.  Don't forget about the October Deal and book your consultation for $10 off during the month of October.  I'll be out of the office starting tomorrow, but just email or leave a message and I'll get back to you as soon as I can.
Hope all is well and I'll be sure to post when I get back from Hawaii!!